- Utica Community Schools
- Home
- Staff Support
- Staff FAQ
-
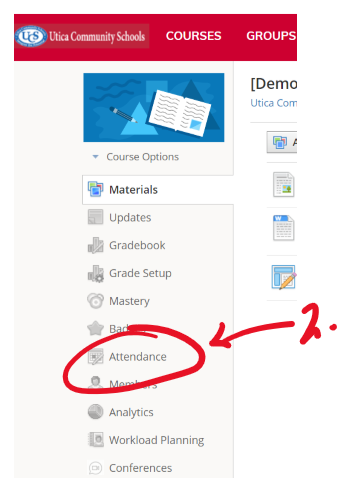
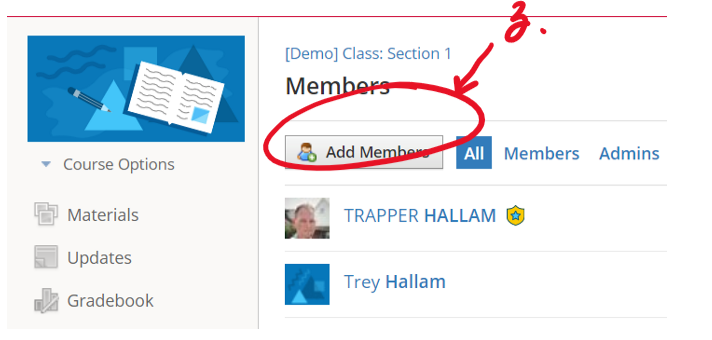
How to Add a Co-Teacher to a Schoology Course
- Go into the course
- Click on Members
- Click on "Add Members"
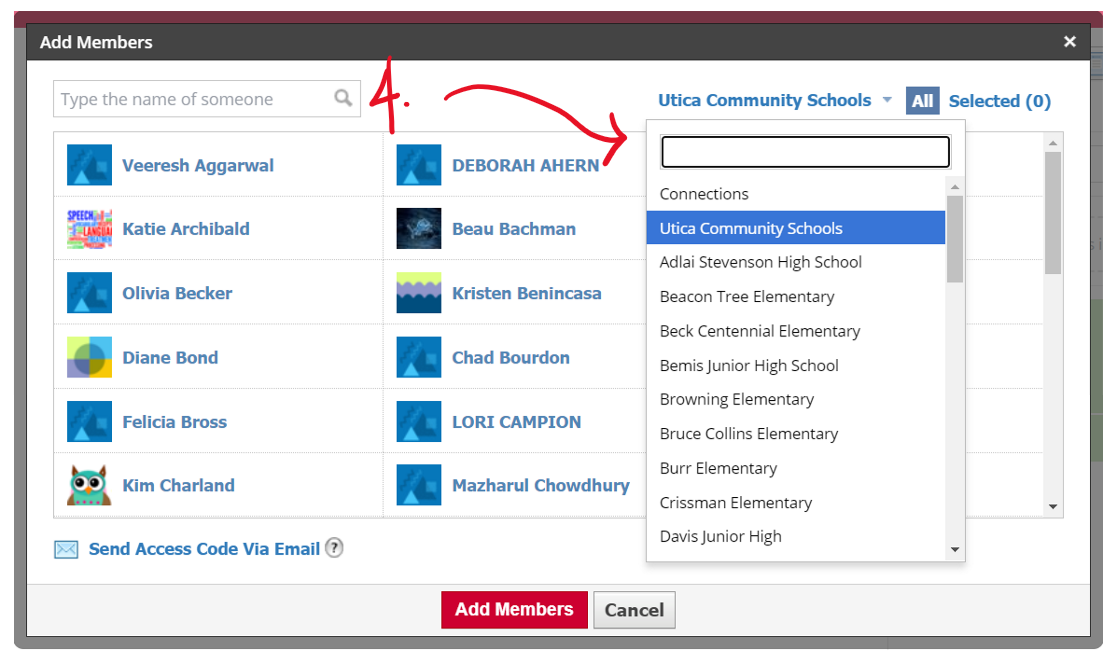
- Select the correct school
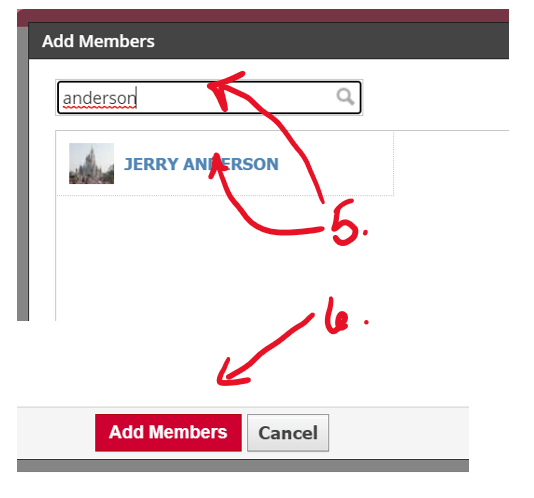
- Type in the name of the co-teacher and select them.
- Click add members
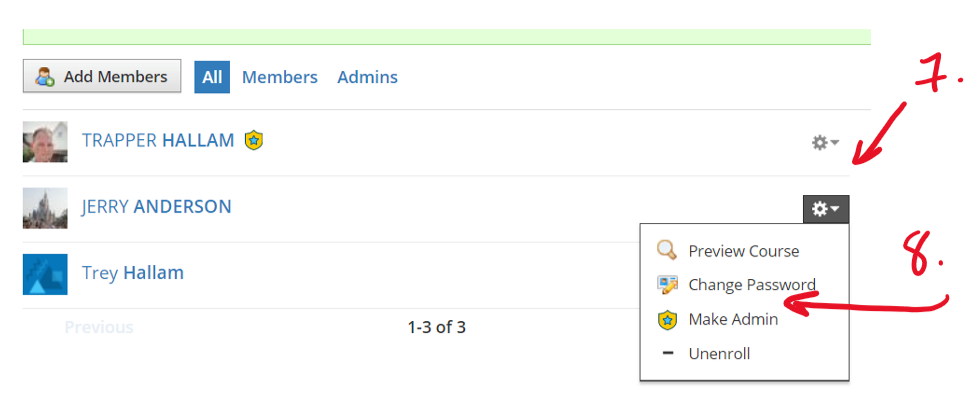
- Click on the settings cog
- Click on "Make Admin"
-
How to Change the Default OneNote Launching app
These directions will show you how to change which app opens when you click "open on desktop" for any Office 365 browser application. These directions are specifically created for OneNote which is not opening OneNote Windows 10 desktop app.
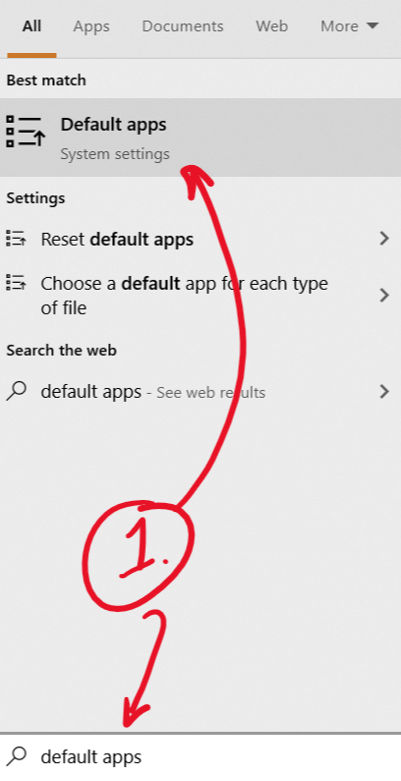
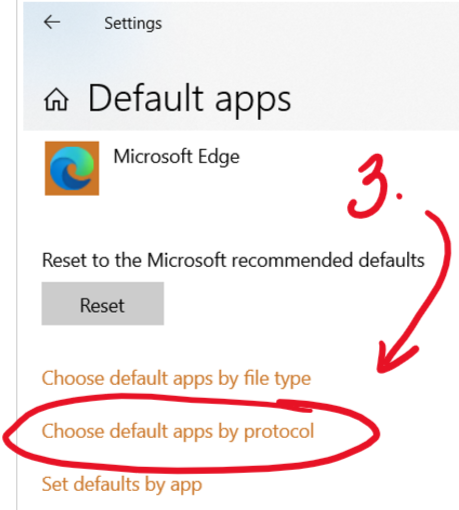
- Search and click default apps
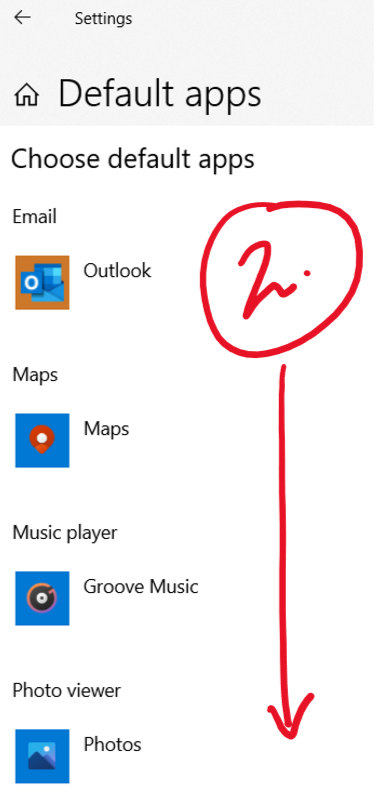
- Scroll to the bottom
- Click "Choose default apps by protocol"
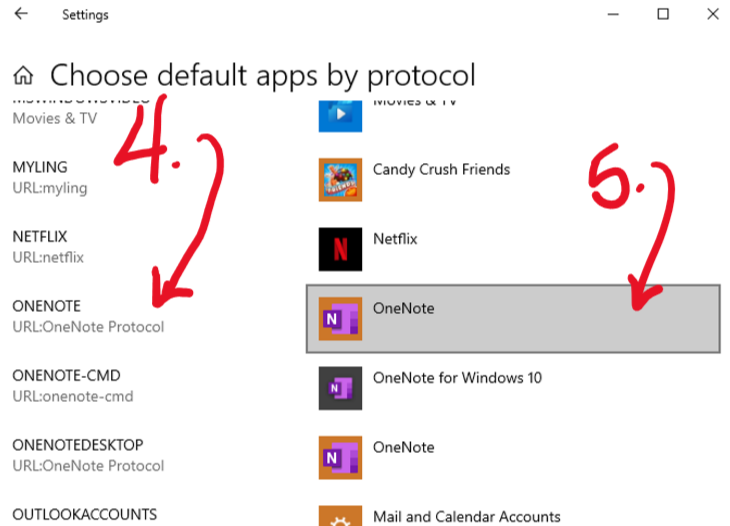
- Scroll down to "ONENOTE-CMD URL:onenote-cmd"
- This should be "OneNote for Windows 10, if" you do not click the image to the right that says "OneNote"
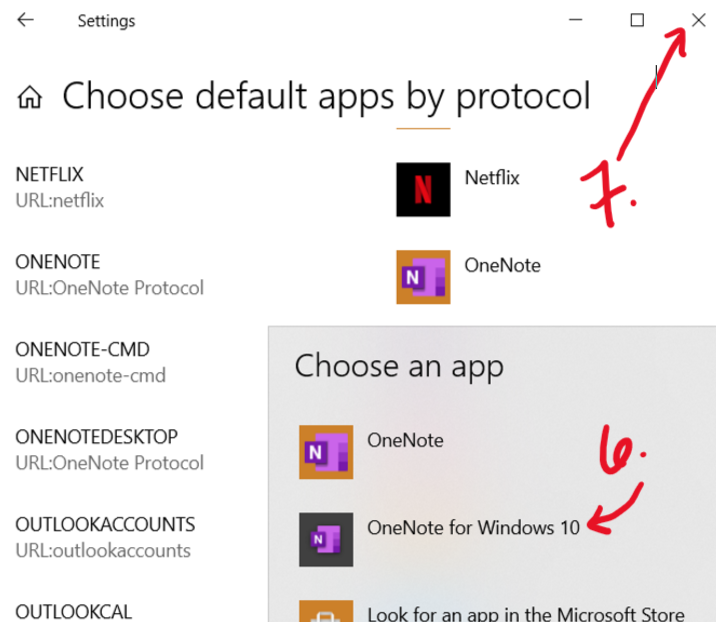
- Chose "OneNote for Windows 10"
- Close the window. The next time you are in the browser and click "Open on desktop", OneNote for Windows 10 will launch instead of the old OneNote app.
-
How to Connect a Personal Device to UCS User WIFI
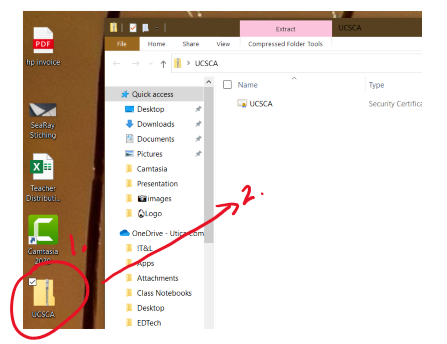
- Download the zip file for the certificate
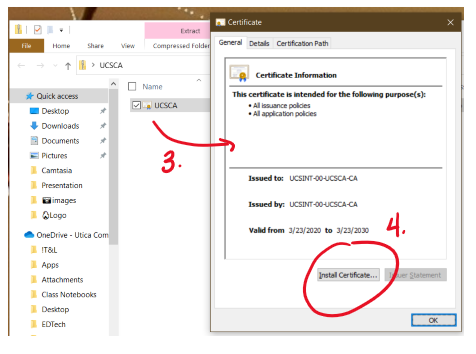
- Double click on the file
- Double Click on "UCSA" to Install the certificate
- Click "Install Certificate"
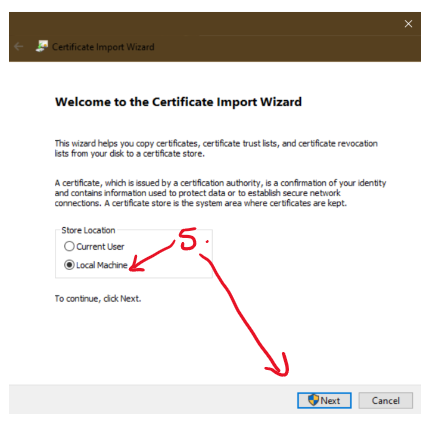
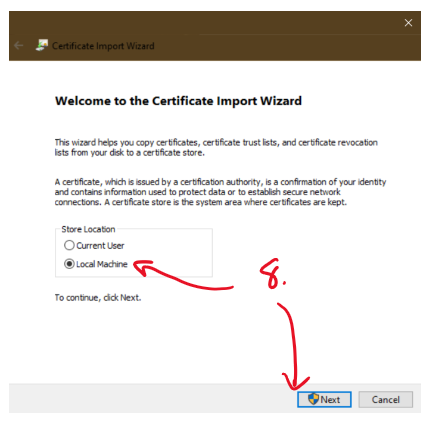
- Click "Local" Machine then "Next"
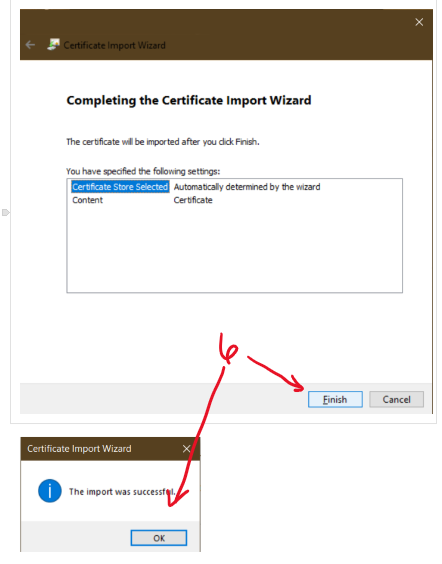
- Click finish and okay
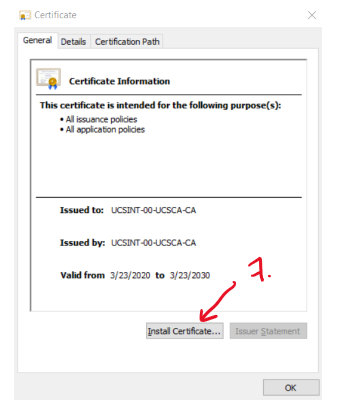
- Click on Install again
- Choose local machine again and next
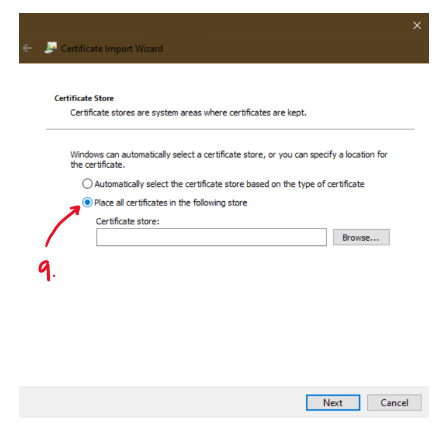
- Choose place all certificates in the following store
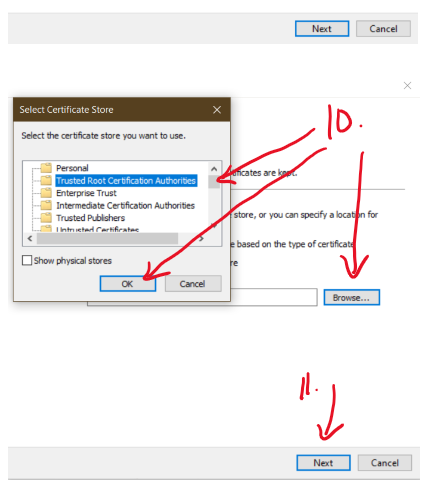
- Click browse and choose "Trusted Root Certification Authorities" then click Ok
- Click next
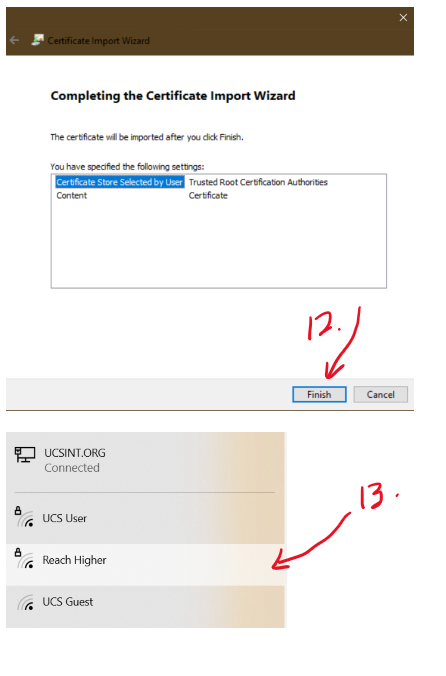
- Click Finish
- Finally, choose UCS user and login with your district credentials.
- https://myuticak12-my.sharepoint.com/:b:/g/personal/trapper_hallam_uticak12_org/EbP839Qrk3ZBoPnL5jJhBDQBurvytWHsjEHAISw9ahc7ng?e=2moDLK
-
How to Convert a PDF to a Word Document
This document will show you how to convert an existing PDF document into a Word document. This works best for PDF's that do not have a lot of pictures or tables.
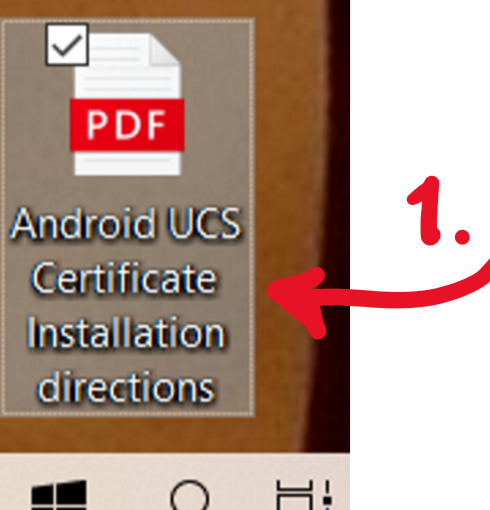
- Locate the PDF document you would like to convert.
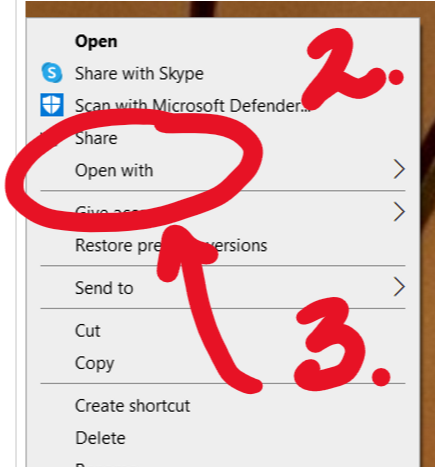
- Right-click on the PDF
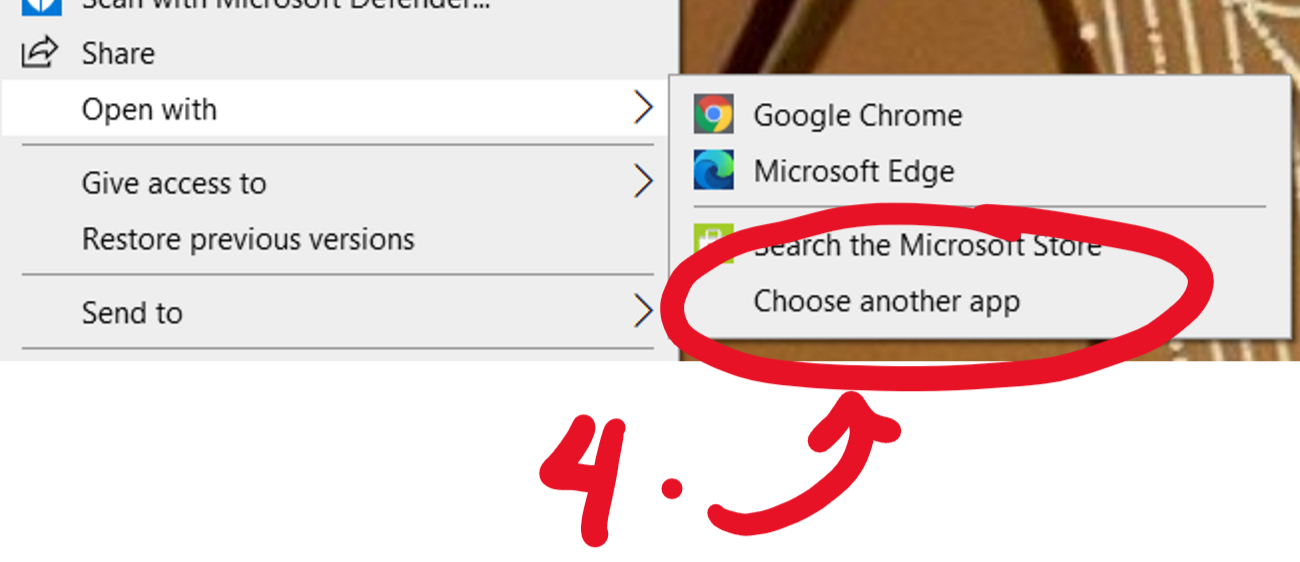
- Click on "Open with."
- Click on "Choose another app."
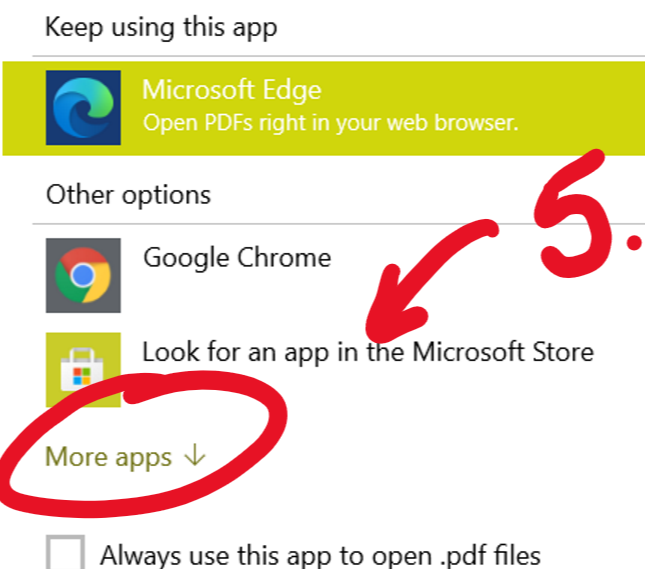
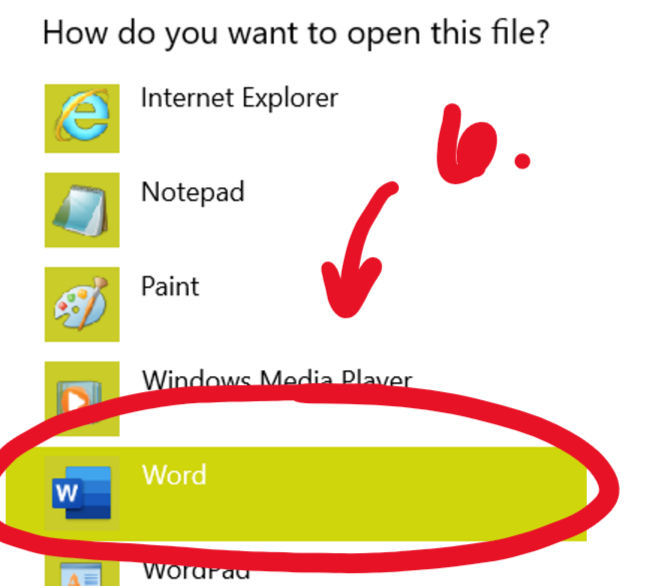
- On the prompt that opens, choose "More apps."
- From the list choose Word.
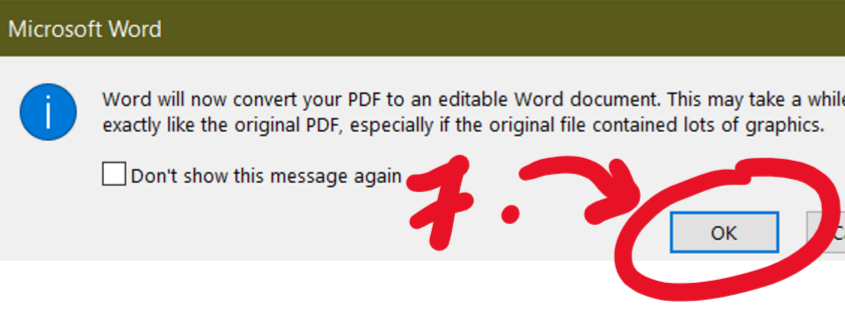
- Click "OK" on the prompt that opens
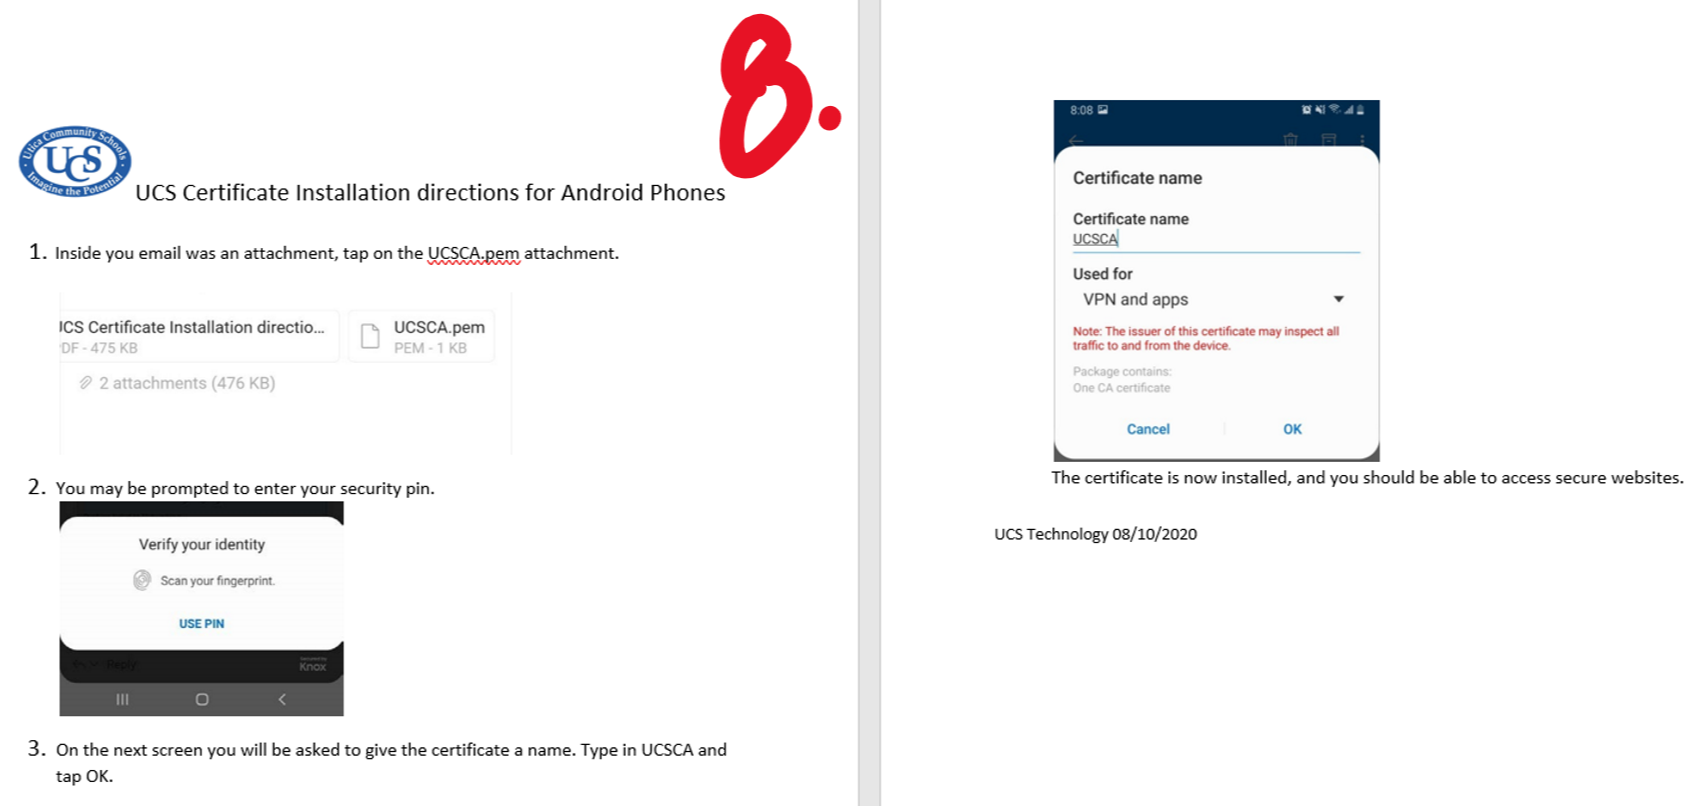
- The conversion will open as a word document for you to edit and save.
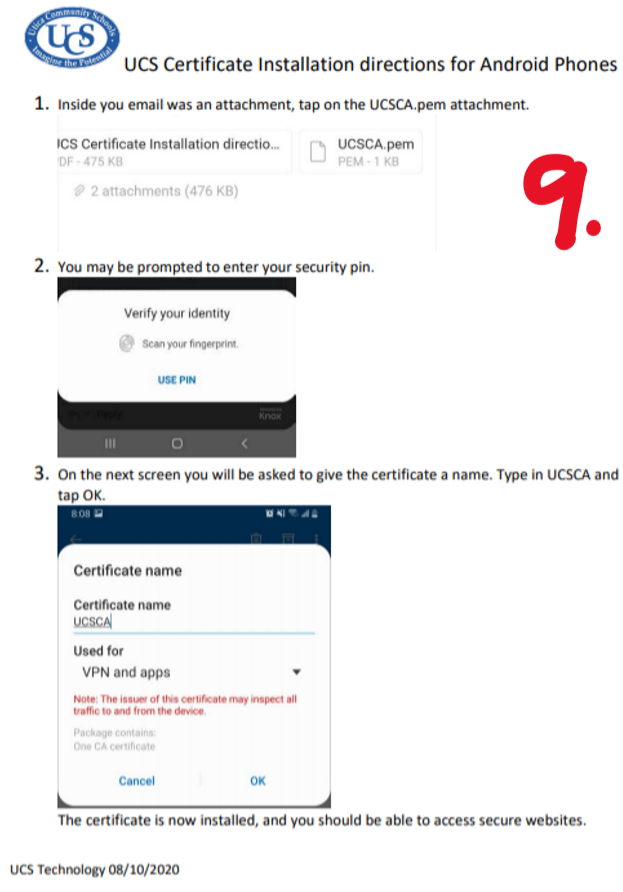
- Here is the original PDF document for reference.
-
How to Create a Chat in Teams
These directions will show you how to create an individual or group chat. Chat's are great for communicating via text, video, or audio with a single or group of district users. Additionally it givesyou a tab for all files shared.
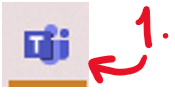
- Go to Teams
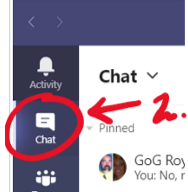
- Click on "Chat."
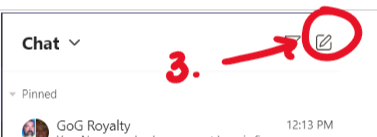
- Click on the new chat icon.
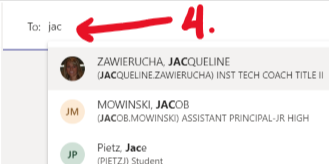
- Type and select the name of who you would like to chat with. Add as many as many people as you would like.
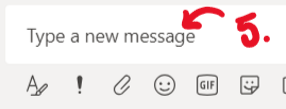
- Click in the message box to start a conversation.
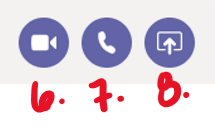
- Click the video icon to start a meeting
- Click the phone icon to start a call
- Click the share icon to share your screen with them.
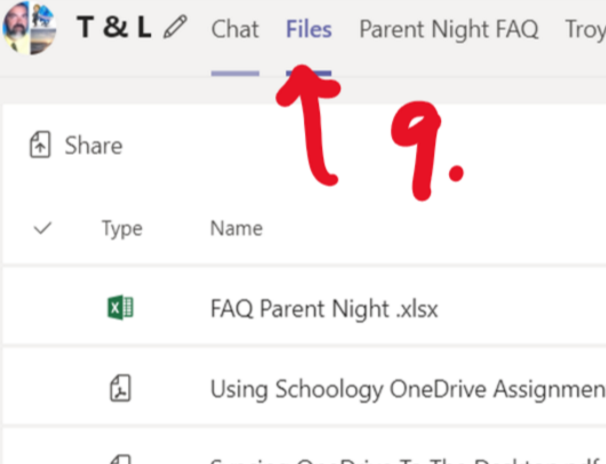
- To share a file drag and drop it into the message box. Click on the "Files" tab to see all of the files that you've shared in the chat.
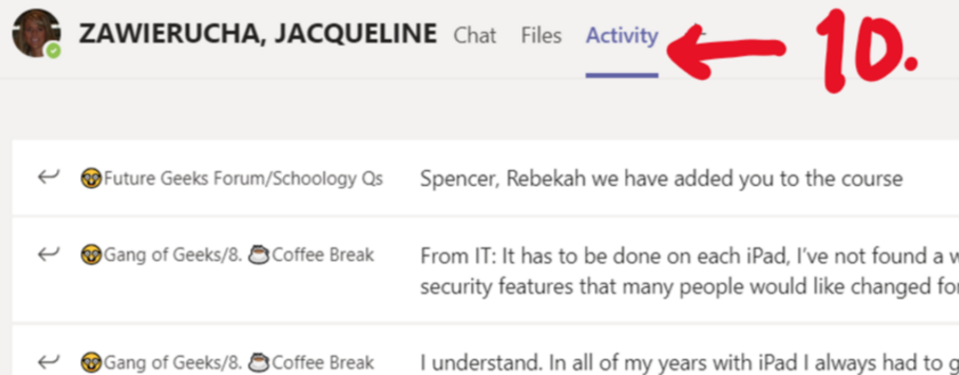
- If in an individual chat click the "Activity" tab to see all of the persons activity in Teams

-
How to Create a Meeting Link in Schoology
This document will show you how to set up a Teams Meeting link in Schoology.
- Go to the course you would like to make the link for and click on "Add Materials."
- Choose "Add File/Link/External Tool."
- Choose "Link."
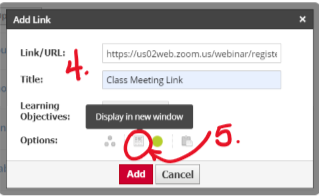
- Paste the meeting link and name the meeting.
- IMPORTANT: Click the little paper icon once so that it says "Display in a new window."
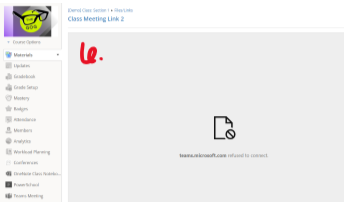
- If you do not, the meeting will try to launch in Schoology and you will make this error.
- If this does happen, you can still enter the meeting by clicking the launch icon in the upper right of the Schoology screen.
![Course Options Materials Updates Gradebook Grade Setup Demo] Class: Section I Cl chools •ca Commur Add Materials • Options Add Assignment Add Test/QuiZ Add File/Ljnk,'External Tool Add Discussi](/cms/lib/MI50010997/Centricity/Domain/1820\image_26912868171669995389450.png)


-
How to create a Teams Meeting in Outlook
These directions will show you how to create Teams Meetings from Outlook. The advantage of creating meeting links in Outlook is that you can invite other teachers as presenters. Additionally, it will also put the meeting in their calendar for reference and notifications.
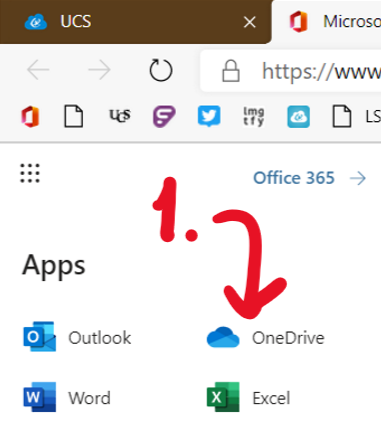
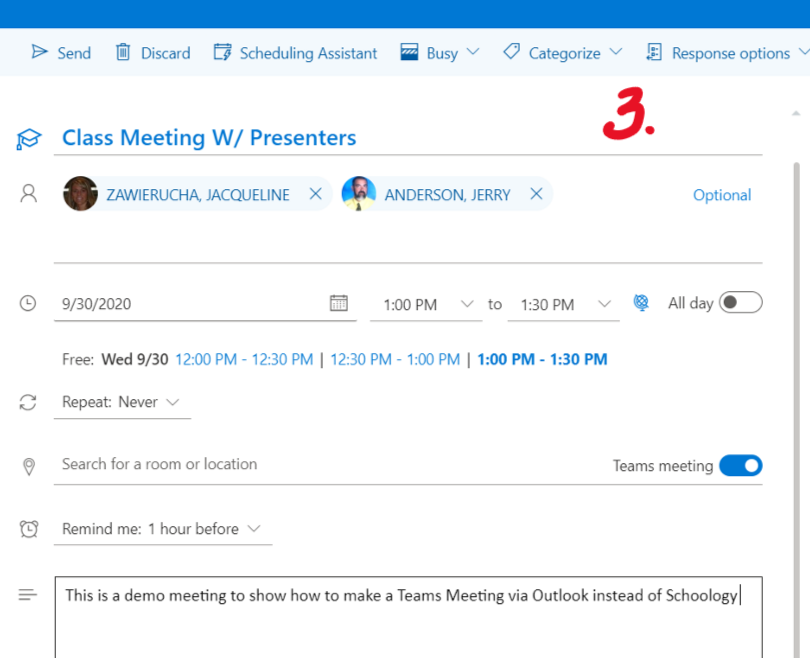
- Go to Outlook.
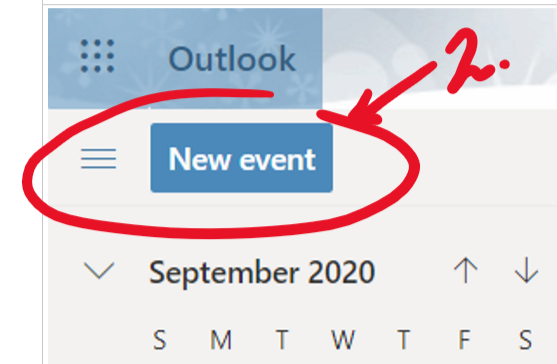
- Click "New Event."
- Fill in the meeting information.
- Click the "Teams meeting" toggle
- Add yourself and any other presenters.
- Notice that the Team meeting link is not shown yet.
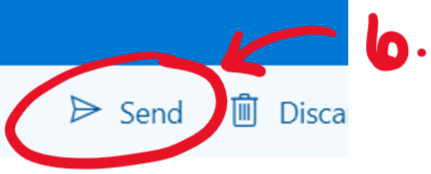
- Send this meeting.
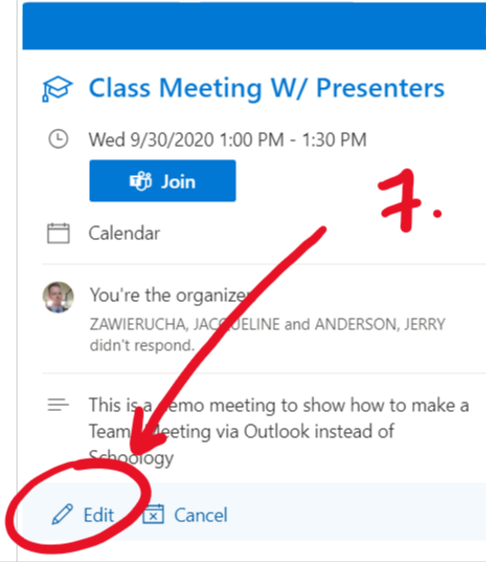
- Now click on the meeting you just created and choose edit.
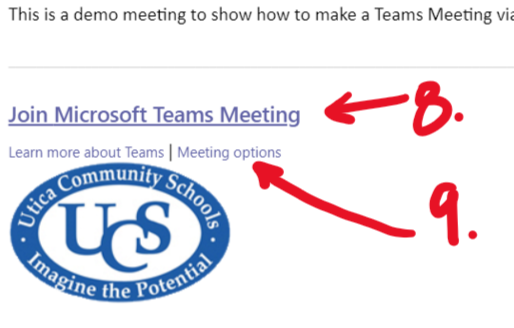
- Now you will see the Team meeting link. Right-click on "Join Microsoft Teams Meeting" and copy the link. Paste this link for your students (most likely in Schoology)
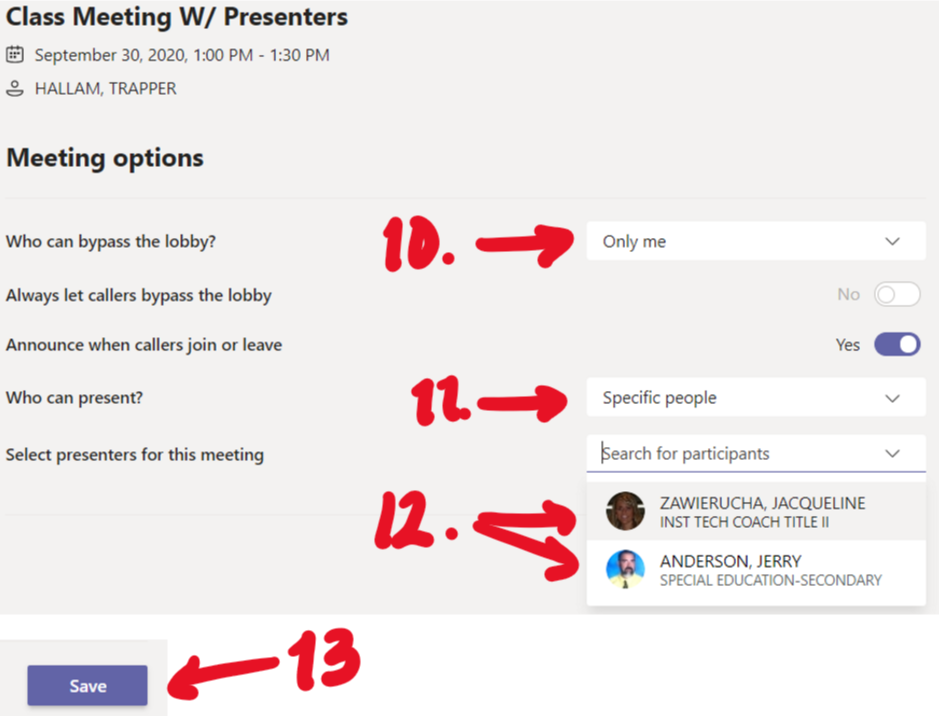
- Last, we need to adjust the meeting options.
- In the meeting, options choose "only me" for who can bypass the lobby.
- Click "Specific people" for who can present.
- Choose the teachers that you invite to the meeting. They will not show up unless you invite them while creating the meeting.
- Click save.


-
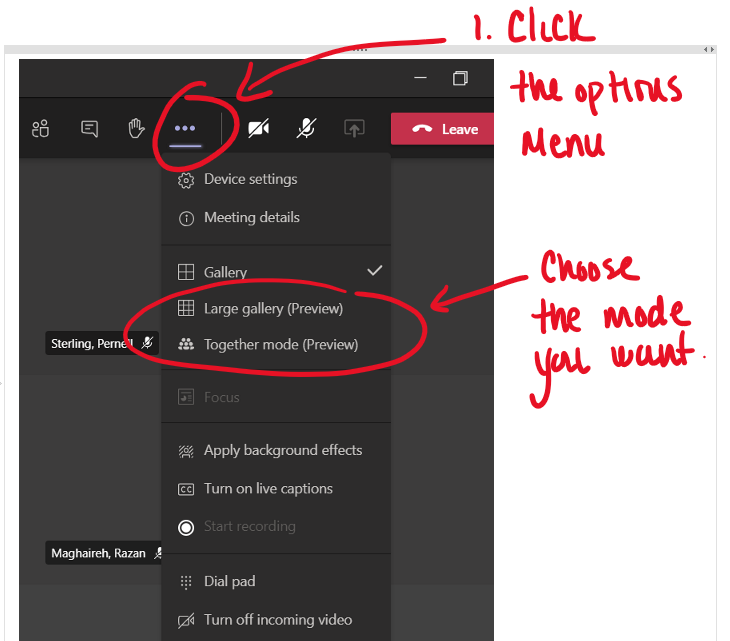
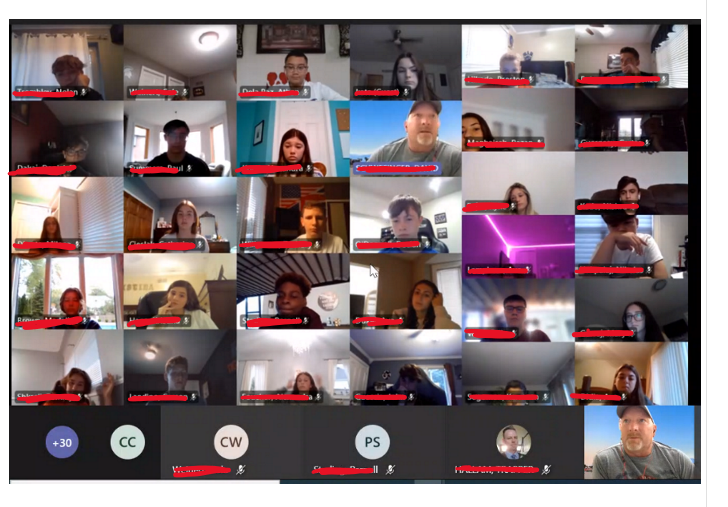
How to Enable Gallery and Together Mode in a Teams Meeting
- In a Teams Meeting, click the three dots
- Large Gallery or Together Mode
- Note these are only available if there are enough people in the meeting.
-
How to Install Microsoft 365 on Personal Devices For Free
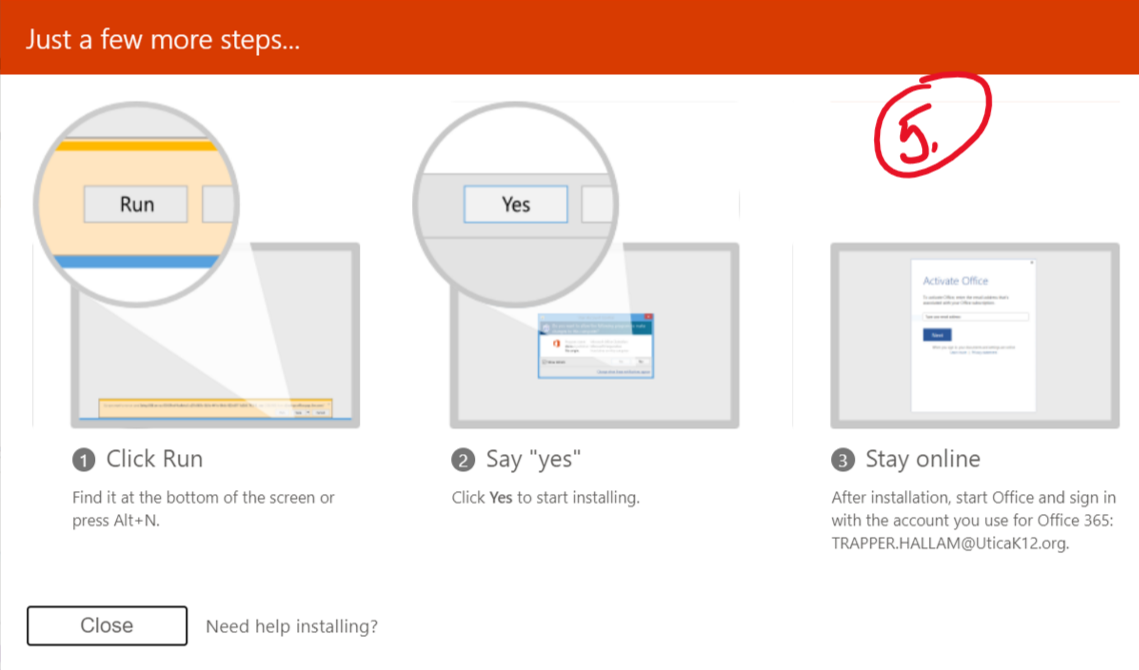
Utica families are able to download the full Microsoft 365 suite for free at home. This suite includes Word, Excel, PowerPoint, and more. Each student has access to download the Microsoft suite on up to five personal computers. To take advantage of this program, use the directions below.
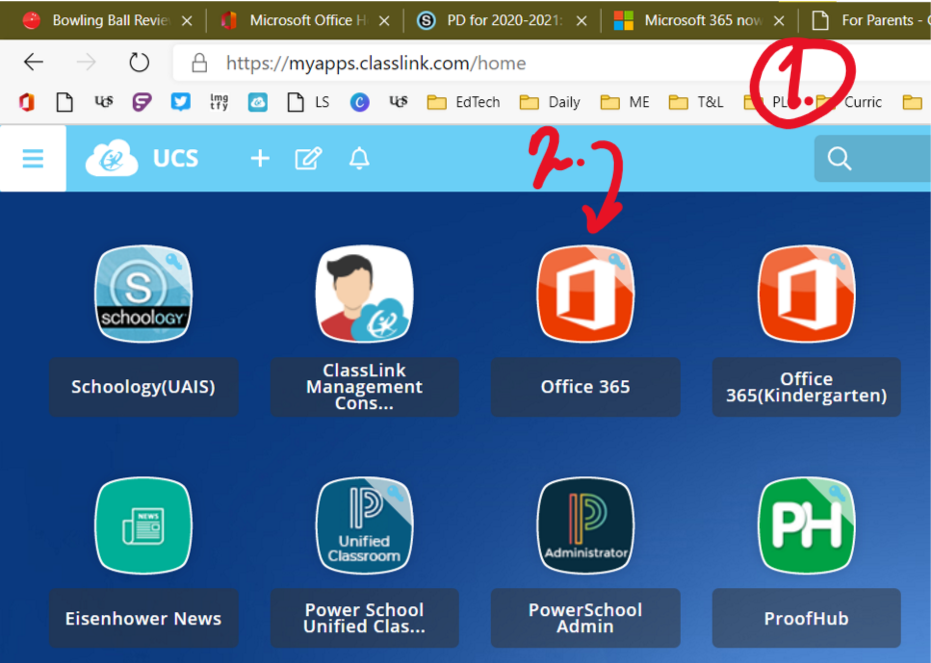
- Go to ClassLink
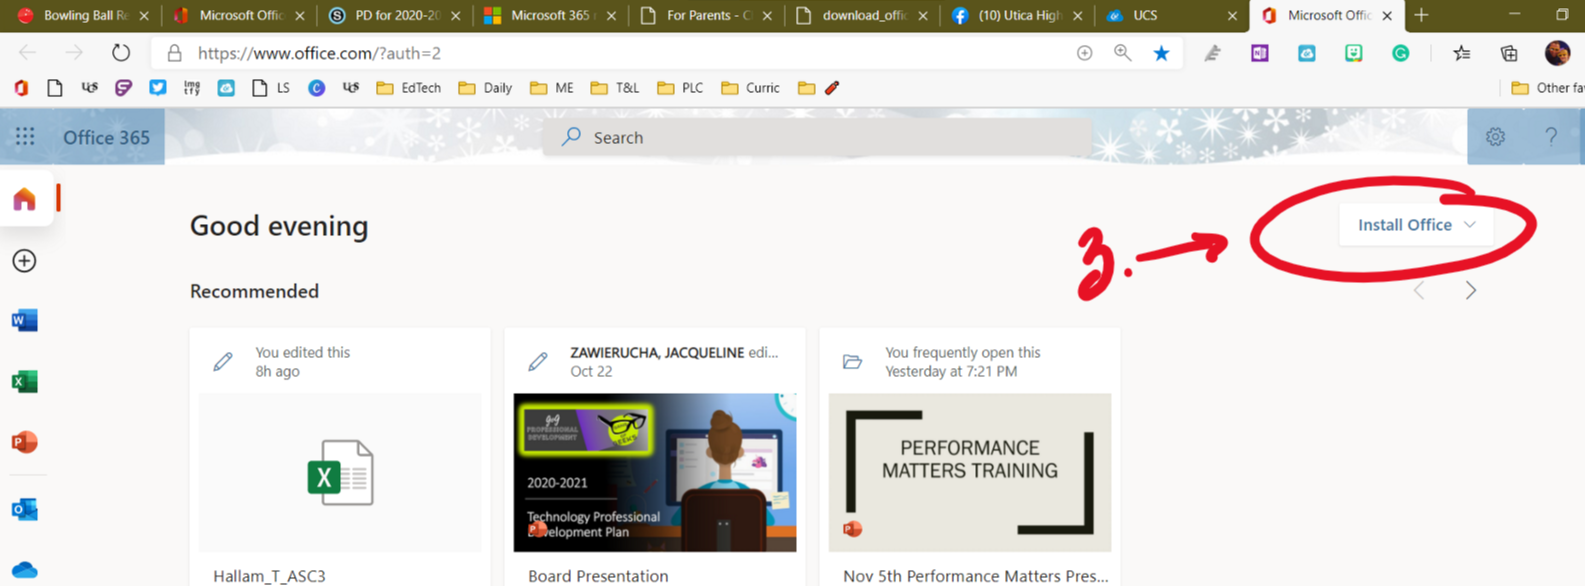
- Click on Office 365
- On office.com, click on "Install Office".
- Choose "Office 365 apps"
- Follow the instructions.

-
How to leave a Microsoft Team
- Click on Teams
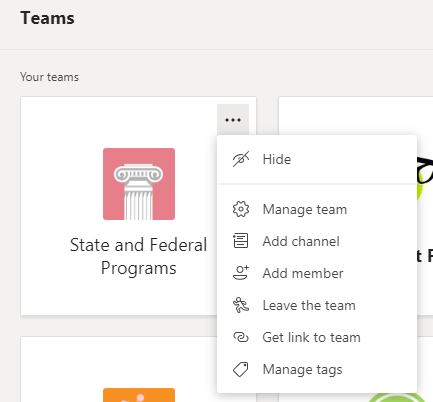
- Click on the three dots (menu icon)
- Choose Leave Team
-
How to Manage OneNote Class Notebooks
These directions will show you how to access and manage OneNote Class Notebooks. This will work for OneNote Classroom Notebooks that were created through Schoology or via the Class Notebook app in the Office 365 app.
Part 1 - Schoology
- This method will only work if you created the notebook in Schoology.
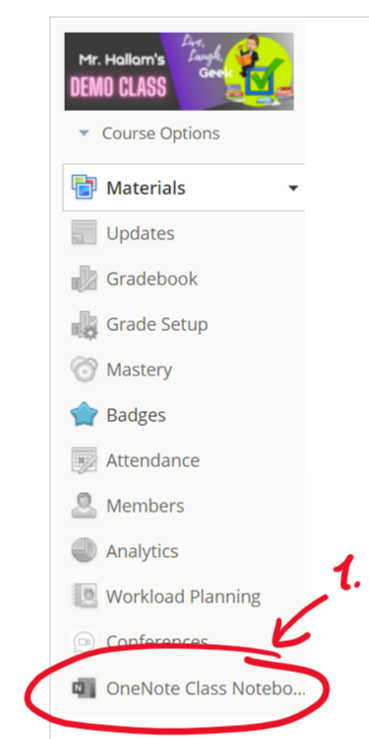
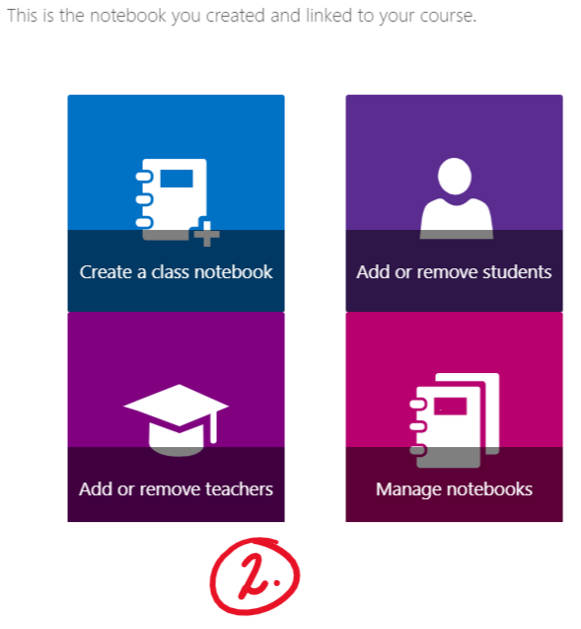
- Go to your course and click on the OneNote Class Notebook Tab.
- Choose the aspect of the Notebook you would like to manage.
Part 2 - Office 365
- This method will work if you created the notebook using the Office 365 app or Schoology.
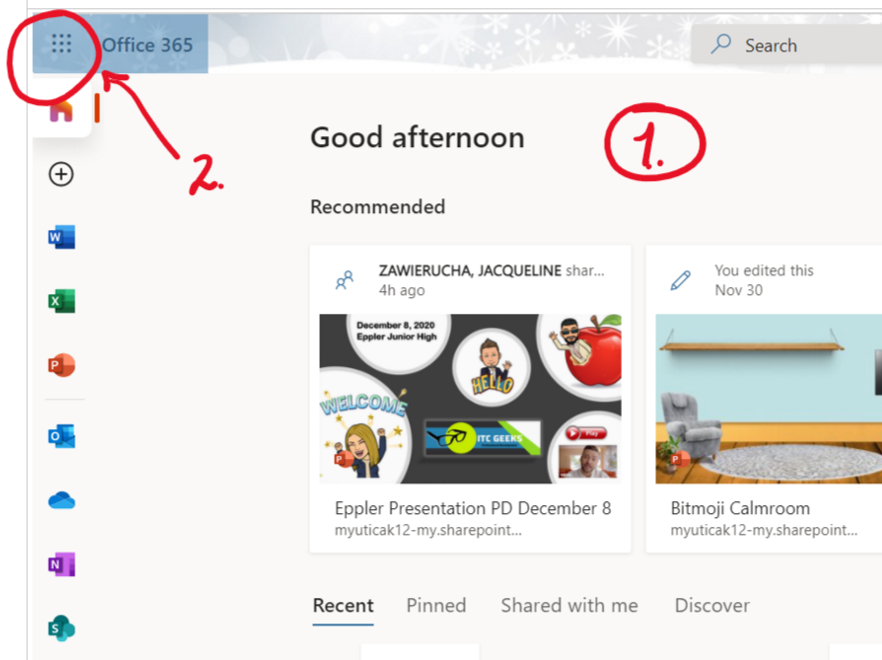
- Go to your office 365 splash page (This will also work by accessing your email or any Office 365 apps).
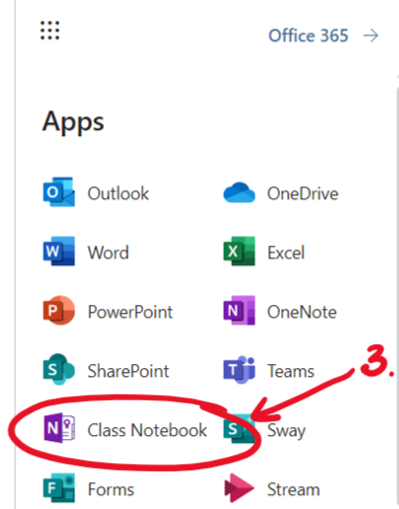
- Click on the waffle in the upper left corner.
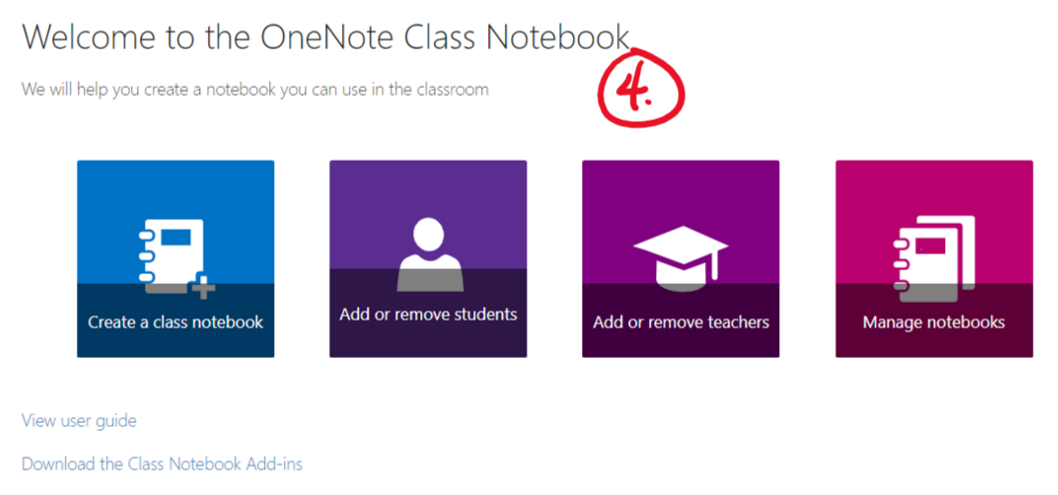
- Click on Class Notebook
- Choose the aspect of the Notebook you would like to manage.
-
How to Remove Students from OneNote Class Notebook
This document will show you how to remove students from your OneNote Class Notebook. This would be something that you would do if students are no longer in your class but you still see their notebook.
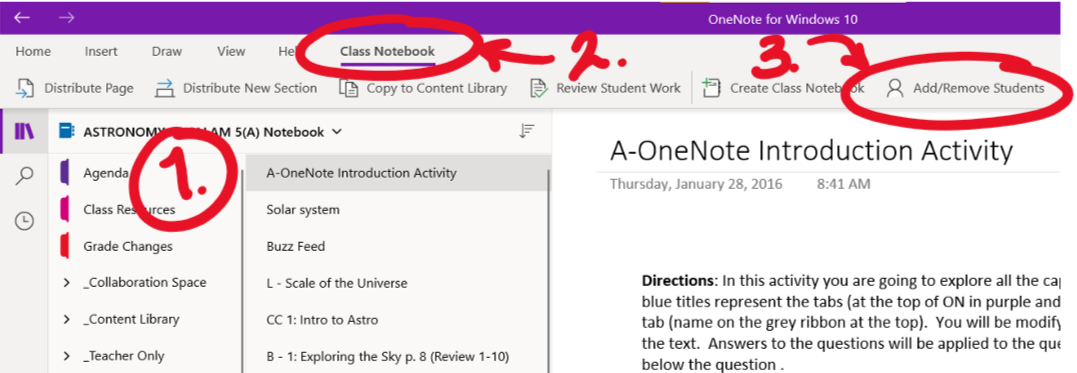
- Open your OneNote
- Click on the "Class Notebook" tab at the top.
- Click on the "Add/Remove Students" button at the top.
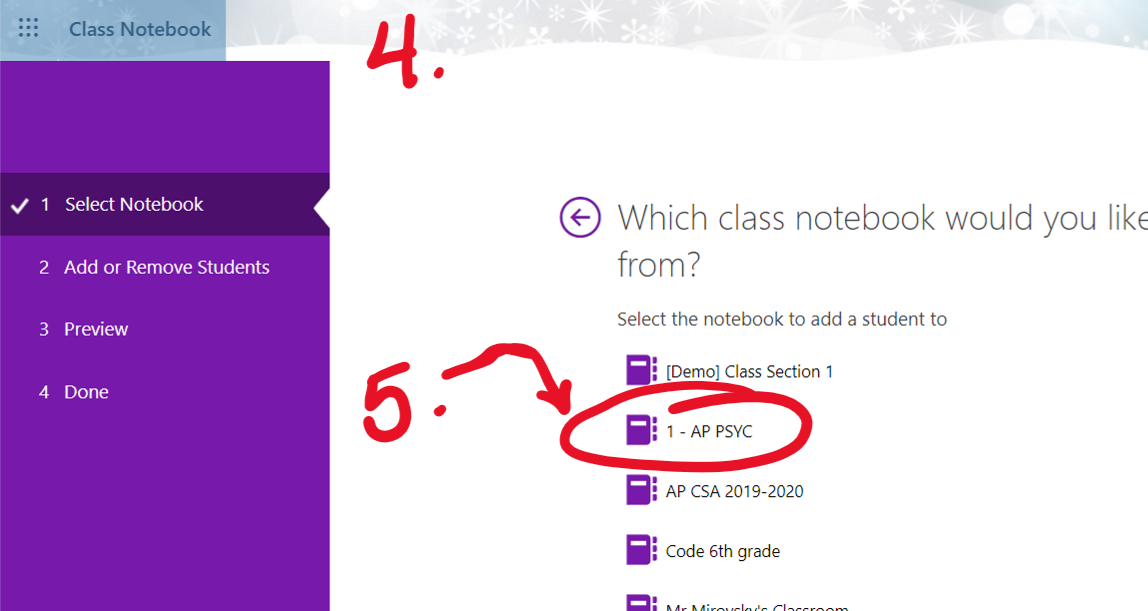
- A browser tab will open. Sign in if it prompts you.
- Choose the Class Notebook you would like to remove student from.
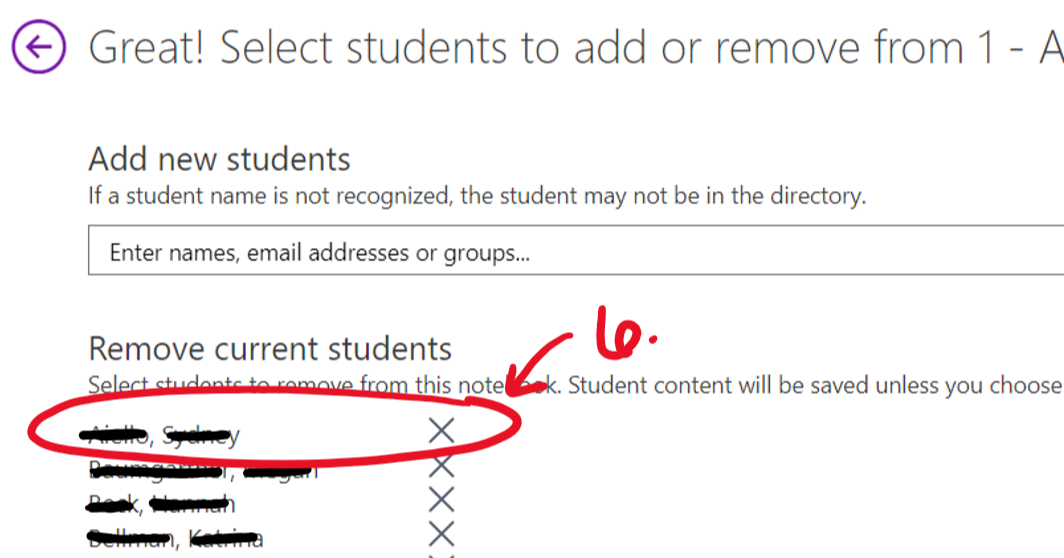
- Click the "X" to the right of the student's name you would like to remove from the notebook.
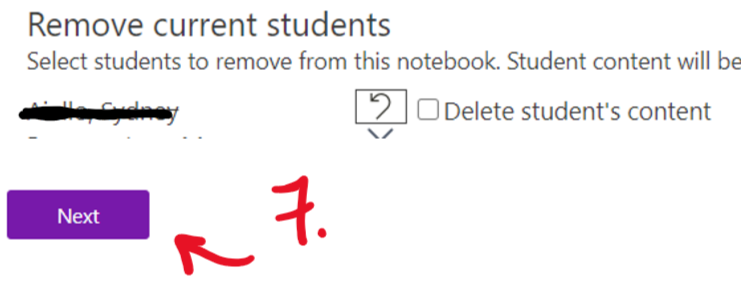
- Click next when your are done removing students
- Confirm you have the correct students, then click "Update.

-
How to Set an Image to the Background in OneNote
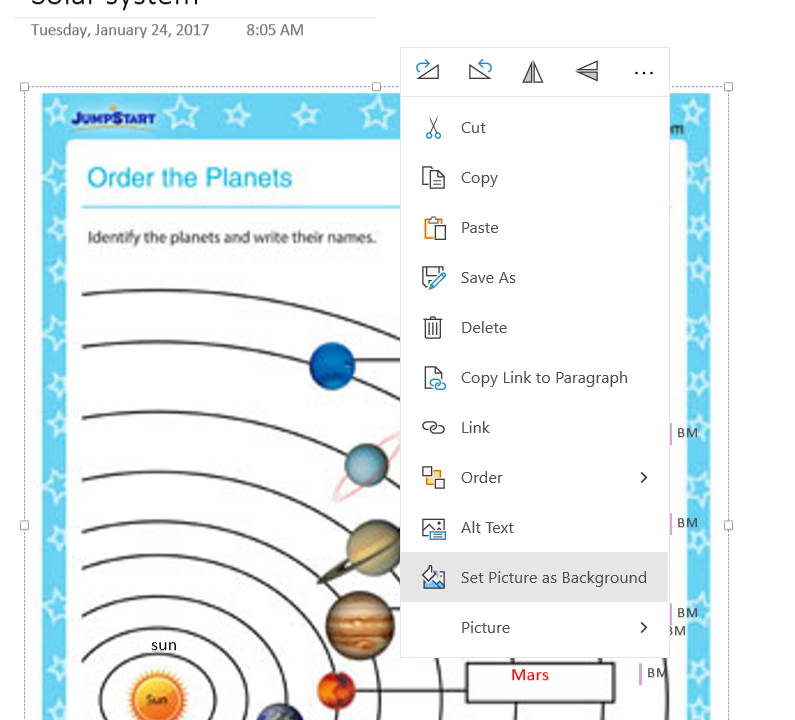
While working in OneNote Teachers and students need to understand that images and text in OneNote function as layers. You can move each layer where ever you want. Sometimes these layers interact with each other in ways that you didn't expect, so things get moved or lost. To help decrease this it's best practice to set images or documents that are printed to OneNote as background images so they don't move.
- Right click on the image
- Choose "Set Picture as Background"
-
How to Take a Screenshot
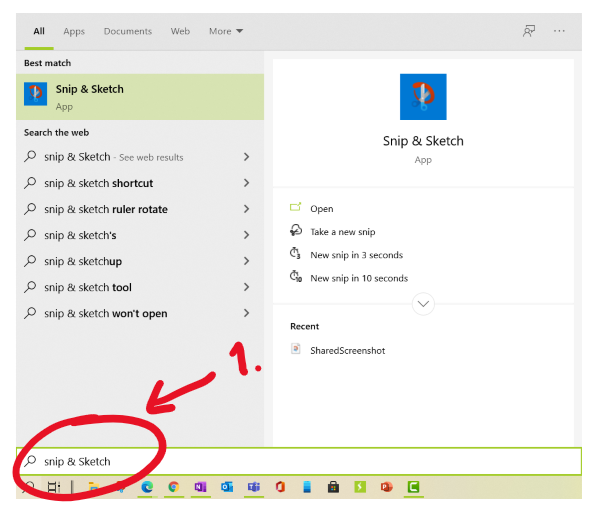
- Type "Snip & Sketch" into the search
- Click on the program
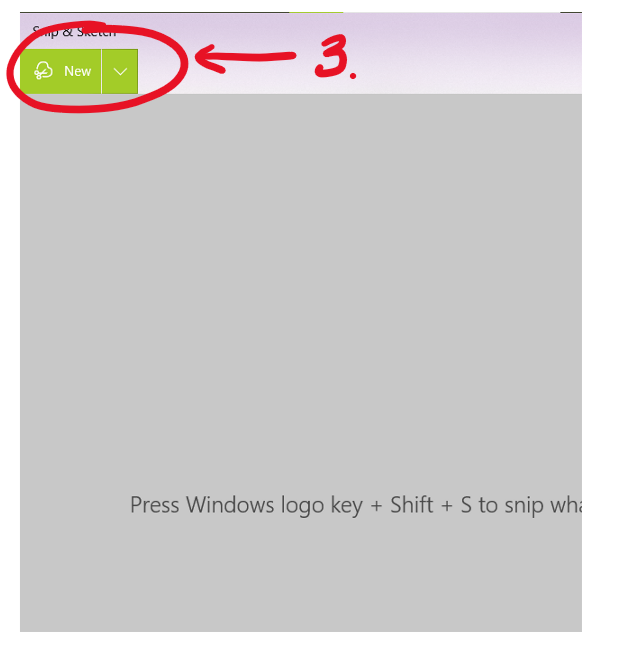
- Select "New"
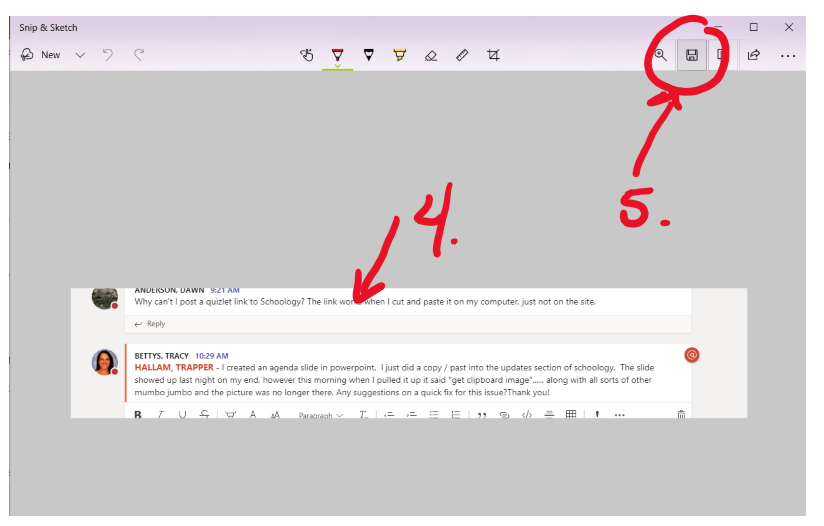
- Take the screen snip
- Click "Save" in the upper right corner
- Save the file wherever you choose (I usually use the desktop for easy access)
- Now the file is saved as an image document and can be uploaded (Schoology) or choose to copy and paste.
- You can also use the keyboard command shift+Windows+S
-
How to Use OneDrive Assignments
Using the "Assign from OneDrive" in a Schoology assignment is a great way to share documents with students. If you use the OneDrive Assignments button while creating a Schoology assignment, it will attach a copy of whatever document you choose for each of your students. This is great because students can easily edit the document and submit the assignment to you. They don't even need to upload the document, it will be done automatically. Here are the steps to do that.
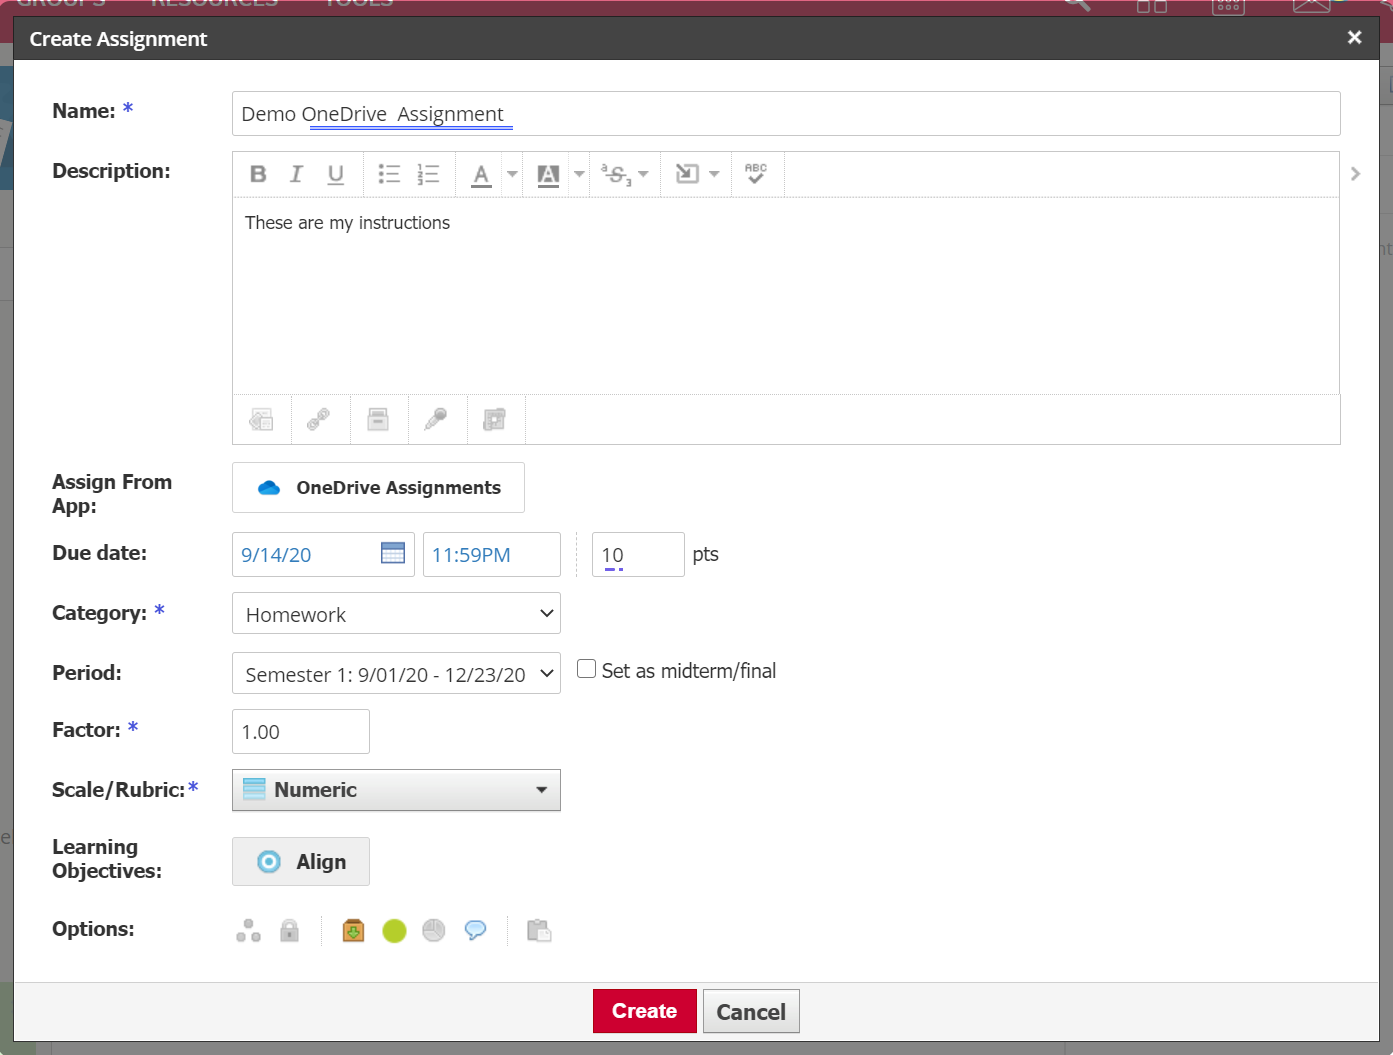
- Create an assignment and fill in all of the appropriate information
- Choose "OneDrive Assignment" button
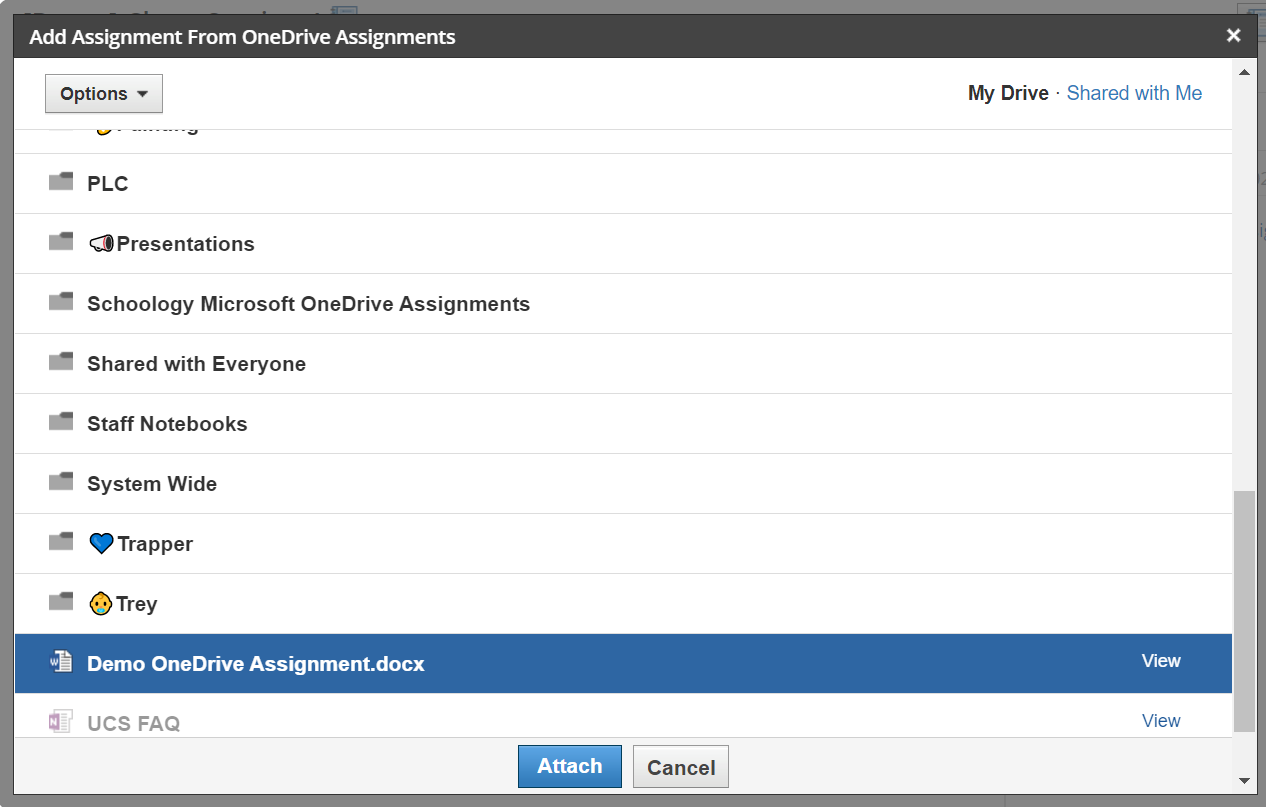
- Navigate to the document you would like to attach and select it.
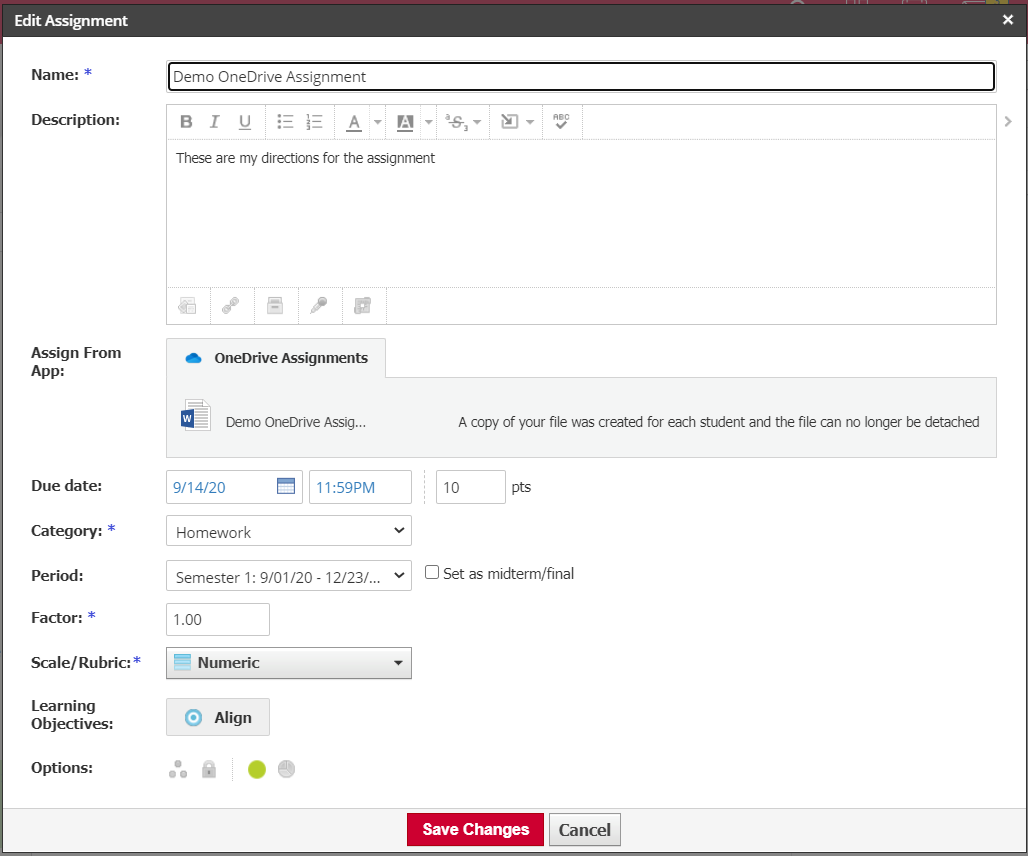
- Create the assignment
- Student view - Click on the assignment
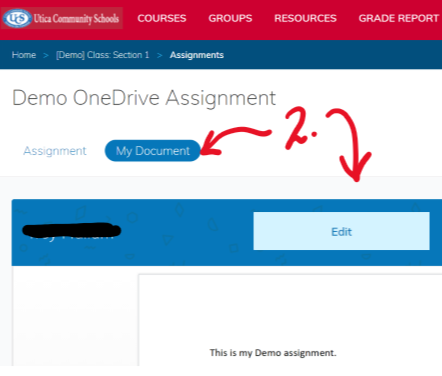
- Student view - Click on My Document
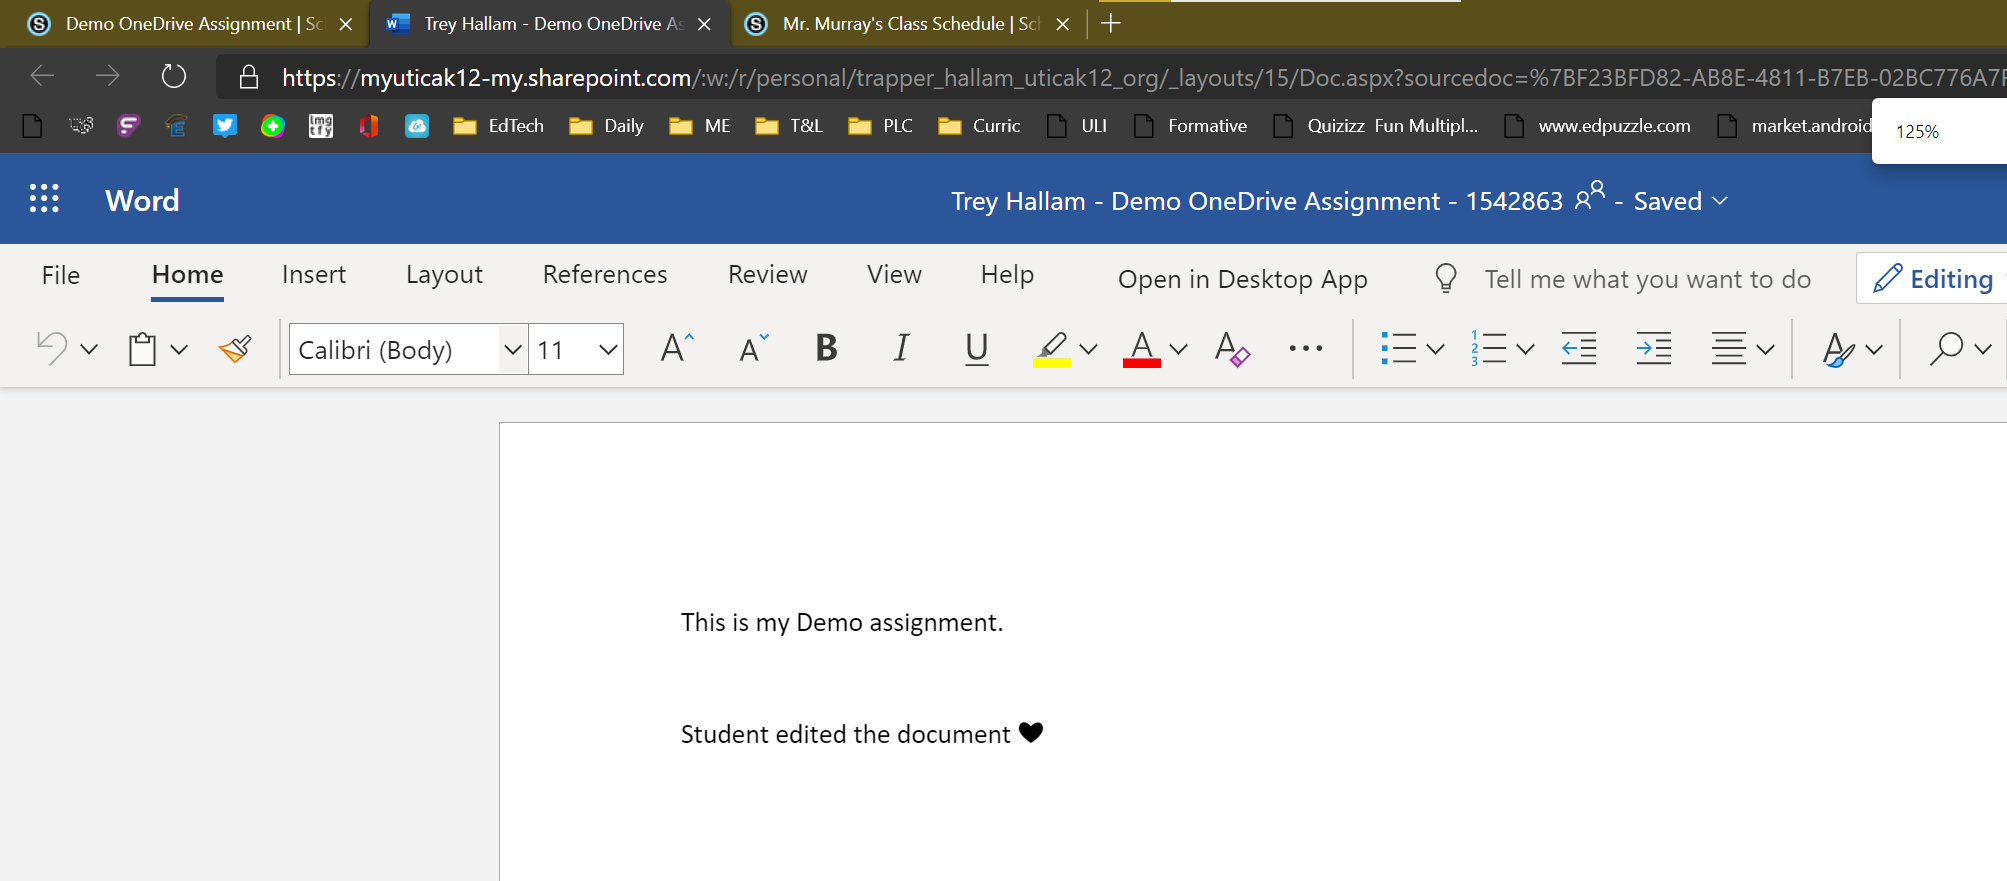
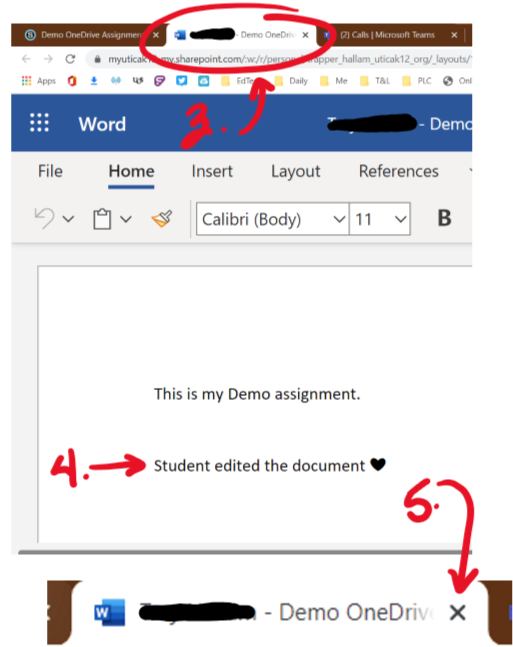
- Student view - the document will launch to a new tab
- Student view - Edit Document
- Student view - close the document (tab) after editing
- Student view - Verify in the Schoology tab the edits are correct (this may require a refresh)
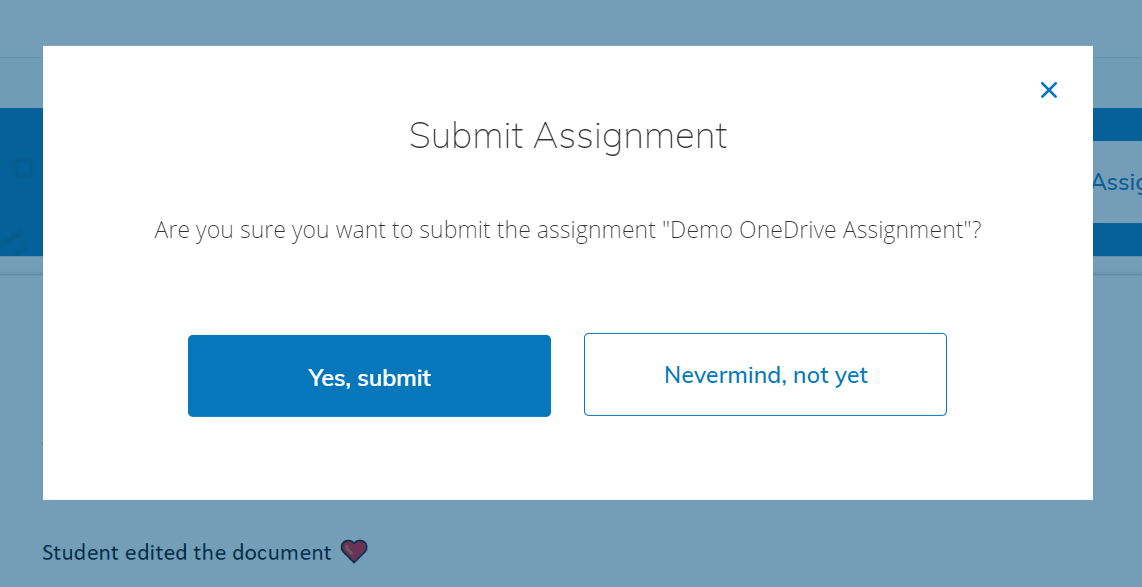
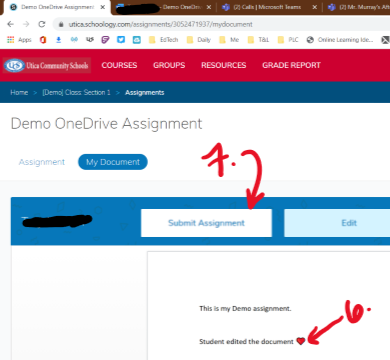
- Student view - Click Submit Assignment
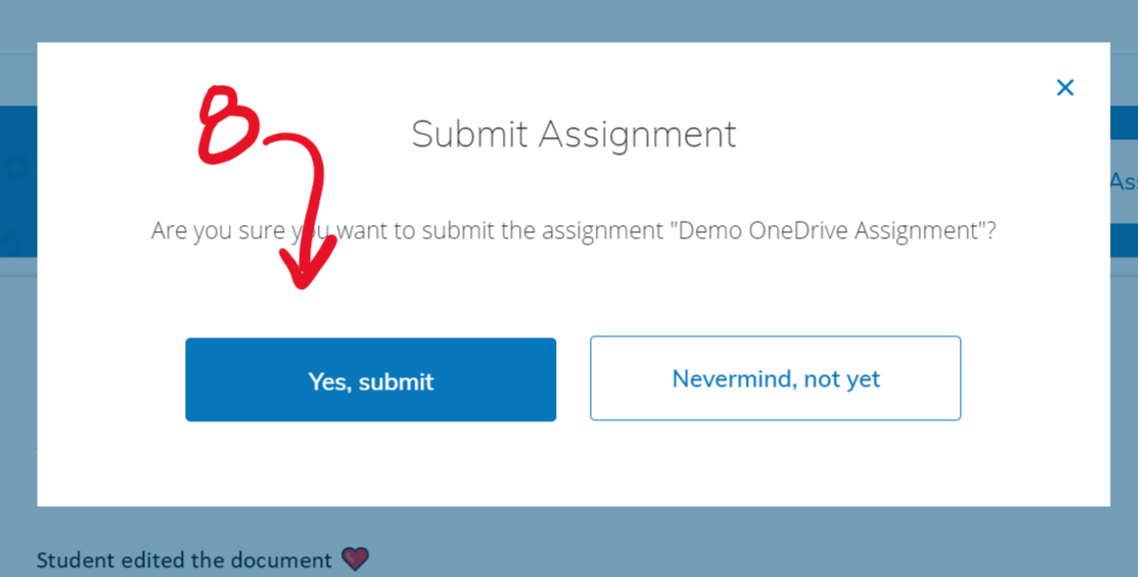
- Sending view - Verify the submission
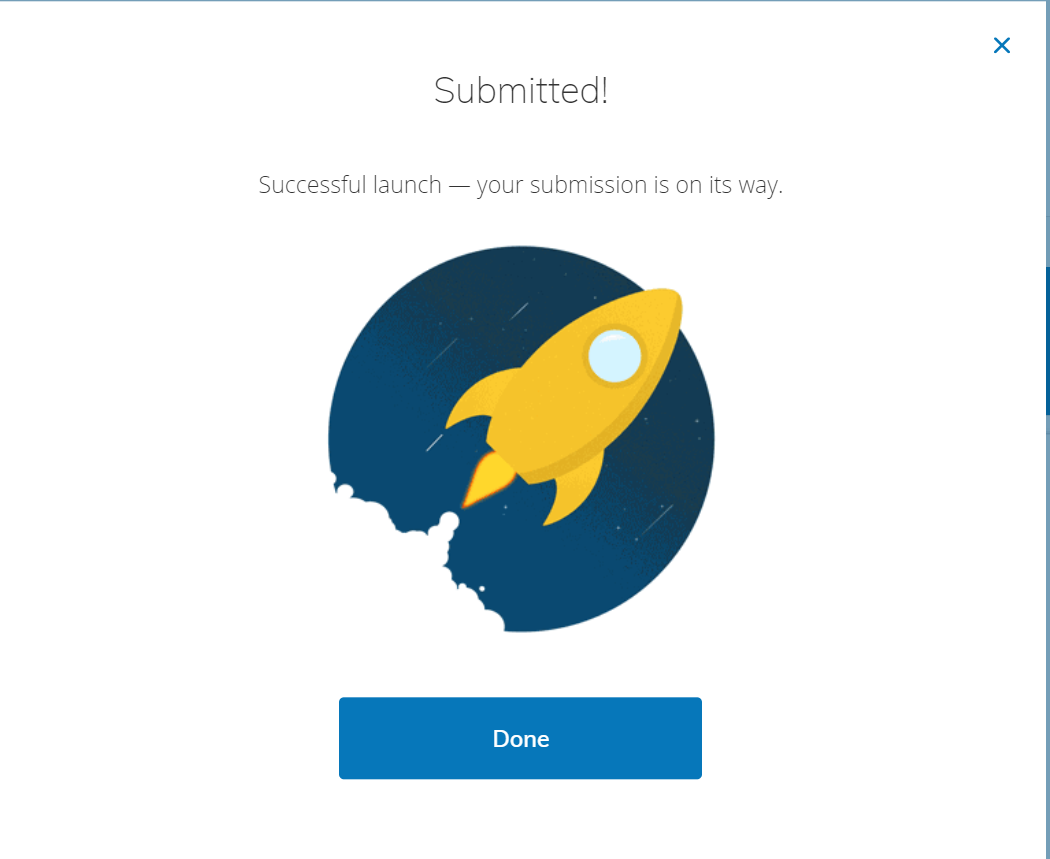
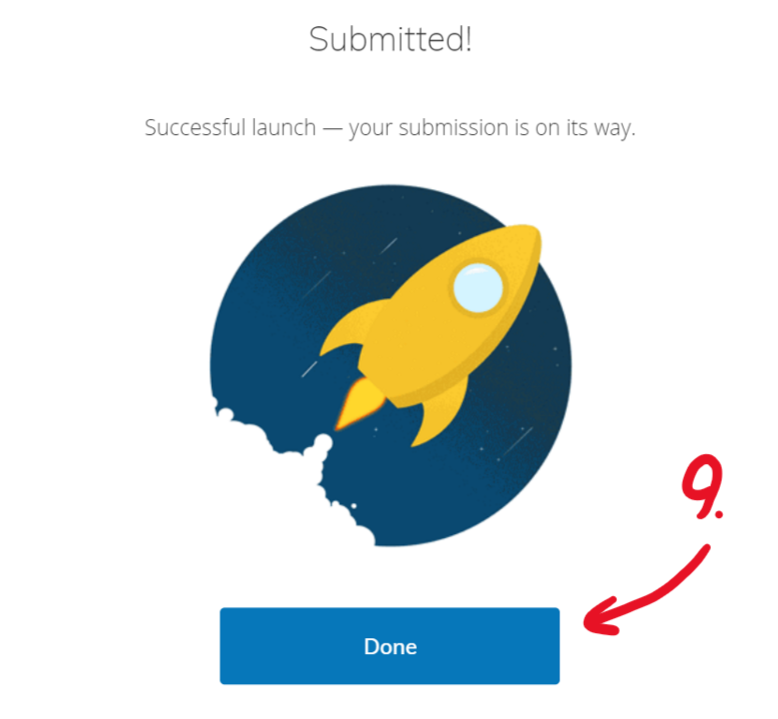
- Student view - Click done
Teacher View
![Utica Community COURSES Course Options Materials Updates Gradebook Grade Setup O Mastery Badges Attendance Members GROUPS RESOURCES TOOLS [Demo] Class: Section 1 C] Utica Community Schools Add Materials • Add Folder Add Assignment Add Test,'Quiz Add Assessment Options Add File/LinkJExternal Tool Add Discussion Add Page Add Media Album Add Package Import from Resources](/cms/lib/MI50010997/Centricity/Domain/1820\image_941840965311669995654422.png)
Student View
![• Course Options Materials Updates Gradebook Grade Setup O Mastery Badges Attendance Members Analytics Workload Planning conferences OneNote Class Notebo... [Demo] Class: Section 1 Cl Utica Community Schools Add Materials • Student Break-out Groups Take a Test demo instructions.docx Sample OneDrive Assignment Class Meeting Link Multiplication Tables Demo OneDrive Assignment These are the directions for my assignment • Due Monday, September 14, 2020 at 1 159 pm All Materials •](/cms/lib/MI50010997/Centricity/Domain/1820\image_289799545351669995654436.png)
![COURSES GROUPS Home > IDemo] Class: Section 1 > Assignments RESOURCES GRADE REPORT Demo OneDrive Assignment Assignment Trey Hallam My Document Submit Assignment Trey Hallam Can't see your document? Click here. Edit This is my Demo assignment.](/cms/lib/MI50010997/Centricity/Domain/1820\image_24039001361669995654440.png)
![Demo OneDrive AssignmentlScX Mr. MurraVsClass SchedulelSc' X CD https://utica.schoology.com/assignments/3052471937/mydocument -5 •S • EdTech Daily ME PLC Curric LtiaCommunitySchools COURSES GROUPS RESOURCES GRADE REPORT Horne > [Demo] Class: Section 1 > Assignments Demo OneDrive Assignment Quizizz Fun Multipl... ed puzzle -corn ma m Submit Assignment Bring schools to life.„ twitter.com lnPrivate > Other Assignment Trey Hallam My Document O Trey Ha llam Can't see your document? Click here. Edit This is my Demo assignment. Student edited the document](/cms/lib/MI50010997/Centricity/Domain/1820\image_775669452381669995654449.png)
-
Schoology - Submitting OneDrive Assignments
This document will show you how to open, edit, and submit a Schoology OneDrive assignment. If the teacher creates the Schoology assignment this way, you will not have to upload anything. You will only need to submit the document when you are done editing.
- Click on the assignment
- Click on "My Document" and then "edit"
- The document will launch to a new tab so you can make edits
- Edit Document
- Close the tab once all of your edits are complete. All edits are automatically saved so you will not lose anything when you close this tab.
- Return to the OneDrive Assignment tab and verify the edits are correct. This may require a refresh.
- Click Submit Assignment
- Verify the submission
- Click done
Student View
![• Course Options Materials Updates Gradebook Grade Setup O Mastery Badges Attendance 2 Members [Demo] Class: section I C) utica Community Schools Add Materials • Student Break-out Groups Sample OneDrive Assignment Multiplication Tables All Materials •](/cms/lib/MI50010997/Centricity/Domain/1820\image_72694208721669993154720.png)
-
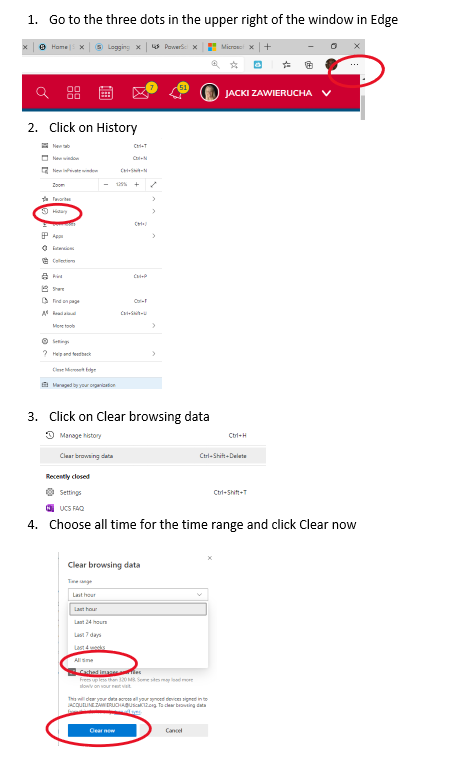
Troubleshoot ClassLink - How to Clear Edges Browsing History
If an app in ClassLink is not functioning properly, one way you may be able to solve the issue is to clear your browsing history.
